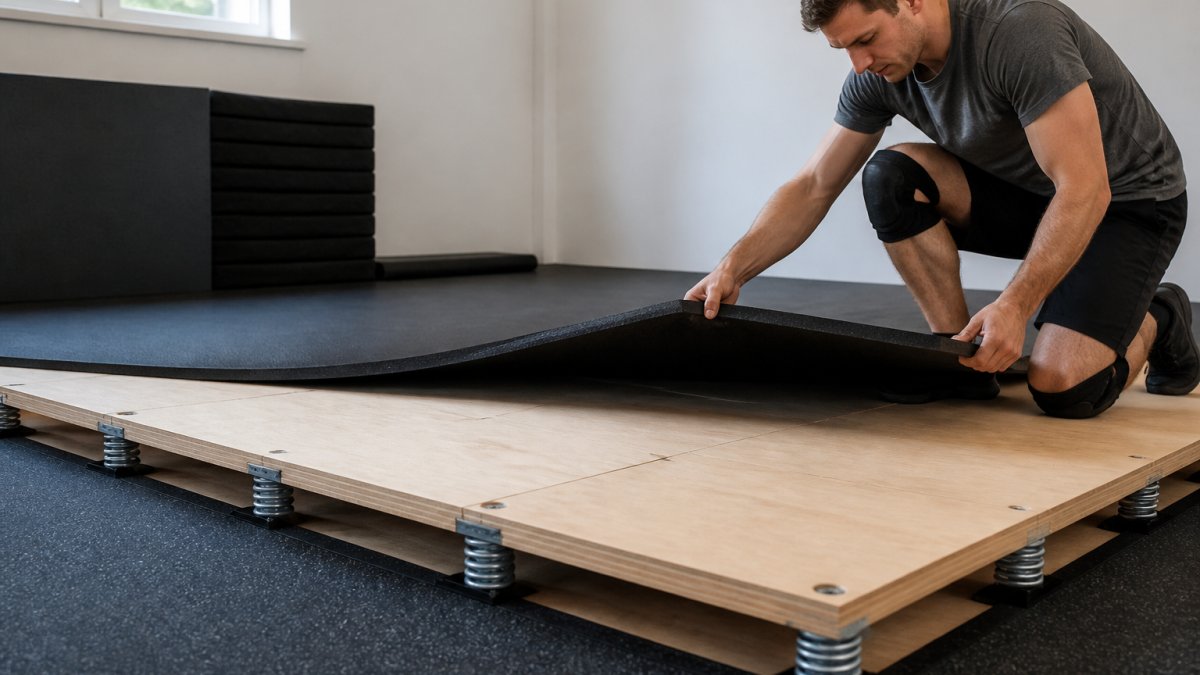
 how-to
Sprung Floors for Small Training Spaces: A Setup Guide
Table of Contents
- What Sprung Floors Are and Why Small Training Spaces Need Them
- How Sprung Floors Absorb Impact and Protect Joints
- Understanding Sprung Floor Subfloor Systems
- Portable Sprung Dance Floor Options for Compact Studios
- Dance Studio Flooring for Small Spaces: Layout and Sizing
- Installation Steps and Tools You'll Need
- Maintenance and Cleaning to Extend Floor Life
- Sprung Floors Versus Standard Hard Flooring
- Frequently Asked Questions
Last Updated: October 5, 2026
What Sprung Floors Are and Why Small Training Spaces Need Them
Sprung floors for small training spaces are layered flooring systems that absorb impact and protect joints during athletic training. Springs or foam sit beneath a resilient surface to cushion movement and reduce injury risk.
Small training spaces, martial arts studios, home gyms, compact dance studios, face a unique challenge: limited square footage means athletes train intensively in the same area repeatedly, and repetitive impact on hard floors accelerates joint wear. A proper sprung floor system distributes force across a resilient surface, letting athletes train harder with less physical toll.
A sprung floor consists of multiple layers: a subfloor base, power springs or foam dampening material, and a top surface (wood, vinyl, or Marley). This layered approach absorbs shock that would otherwise transfer directly to ankles, knees, and hips, translating into more training days, faster recovery, and confidence in movement.
Glory and Power Enterprises manufactures professional-grade sprung floors engineered for these demands, with two-layer Baltic birch construction and power springs built for competitive training environments. For small studios with tight budgets and tighter square footage, understanding how sprung floors work is essential before investing.
How Sprung Floors Absorb Impact and Protect Joints
Impact absorption is the core function of any sprung floor system. When an athlete lands from a jump or executes a high-impact move, force travels downward through the floor layers, and a sprung floor captures that energy instead of sending it straight to joints and bones.
The top surface provides initial give; beneath it, foam or springs compress under load, dissipating energy over a fraction of a second, while the subfloor and base layers prevent the system from bottoming out. This staged compression gives the athlete a gentler deceleration rather than an abrupt stop.
Joint protection is the practical outcome. Ankles, knees, hips, and the lower spine all benefit from reduced impact forces, and over months and years this difference accumulates: fewer stress fractures, less chronic joint pain, and more consistent training. For small studios where athletes train multiple days per week in the same space, this is critical to long-term athlete health and retention.
Floor surfaces vary in comfort while maintaining performance. Wood offers traditional feel and good bounce for dance and gymnastics; vinyl and Marley offer durability and easier maintenance for high-traffic studios; foam-based systems provide maximum cushioning for martial arts and conditioning. The choice depends on the sport and the studio's maintenance capacity.
Understanding Sprung Floor Subfloor Systems
The subfloor is the hidden foundation that determines how well a sprung floor performs, the layer between the existing concrete or hard surface and the visible top floor, where most of the engineering happens.
A sprung floor subfloor uses one of two approaches: floating or attached. A floating subfloor sits on top of the existing floor with springs or foam underneath, allowing the system to move independently, ideal over concrete and requiring no permanent installation. An attached subfloor is fastened directly to the existing surface, offering more stability but requiring more involved installation.
Subfloor material matters. Many professional systems use MDF panels or plywood as a base layer, providing a stable platform for the springs or foam. Power springs are bolted to the subfloor and compressed under controlled tension, creating the "give" athletes feel when they land.
For small spaces, floating subfloors are often better: they adapt to existing concrete without structural modifications. Glory and Power Enterprises designs subfloor systems for compact areas, using panel edges that create seamless joints without gaps that could cause soft spots or movement.
Portable Sprung Dance Floor Options for Compact Studios
Not every small studio can install a permanent sprung floor. Space constraints, rental agreements, or budget limitations may require a portable solution that still provides impact absorption and performance benefits.
Portable systems use modular panels that connect without permanent fastening and stack or nest for storage.
Dance Studio Flooring for Small Spaces: Layout and Sizing
Designing a sprung floor layout for a small space means maximizing usable training area while maintaining safety zones and accommodating the existing layout.
Measuring Your Space and Planning Panel Placement
Start by measuring the actual floor space available, accounting for walls, doorways, and immovable equipment. Many small studios have 1,500-2,500 square feet total, but training areas may be only 600-1,200 square feet, the realistic space for flooring installation.
Next, determine what activities the space must support: a dance studio needs different dimensions than a martial arts school, a gymnastics-focused space needs more open floor for tumbling passes, and a multipurpose studio may need flexible configurations. Once you know the primary use, sketch the ideal floor dimensions.
Sprung floor panels come in standard sizes. Plan your layout around these sizes to minimize waste, then add 10-15% for waste and future expansion.
Panel placement should follow the room's natural flow: position the longest continuous runs along the longest walls and use full panels where possible, since cut pieces waste material and create weak points. Glory and Power Enterprises can provide layout assistance based on your room dimensions.
Clearance and Safety Zones Around Your Floor
Safe training requires clearance around the edges of the sprung floor so athletes don't roll onto hard flooring or into walls during falls or high-impact movements.
Minimum clearance depends on the sport: 2-3 feet for dance and Pilates, 3-5 feet for gymnastics or martial arts (allowing room for tumbling passes or sparring), and 4-6 feet for cheerleading, where athletes may land outside their intended area.
In small spaces this constraint is significant: a 400-square-foot room might accommodate only a 300-square-foot sprung floor once safety zones are counted. Plan to maximize floor area while maintaining minimum clearance, and if clearance is extremely limited, prioritize high-impact zones where athletes land most frequently.
Doorways and equipment also affect layout. Position the floor for clear entry and exit without athletes stepping on and off repeatedly, and design around fixed equipment (mirrors, bars, mats) rather than working the floor around it.
Installation Steps and Tools You'll Need
Installing a sprung floor in a small space is manageable for those comfortable with basic construction.
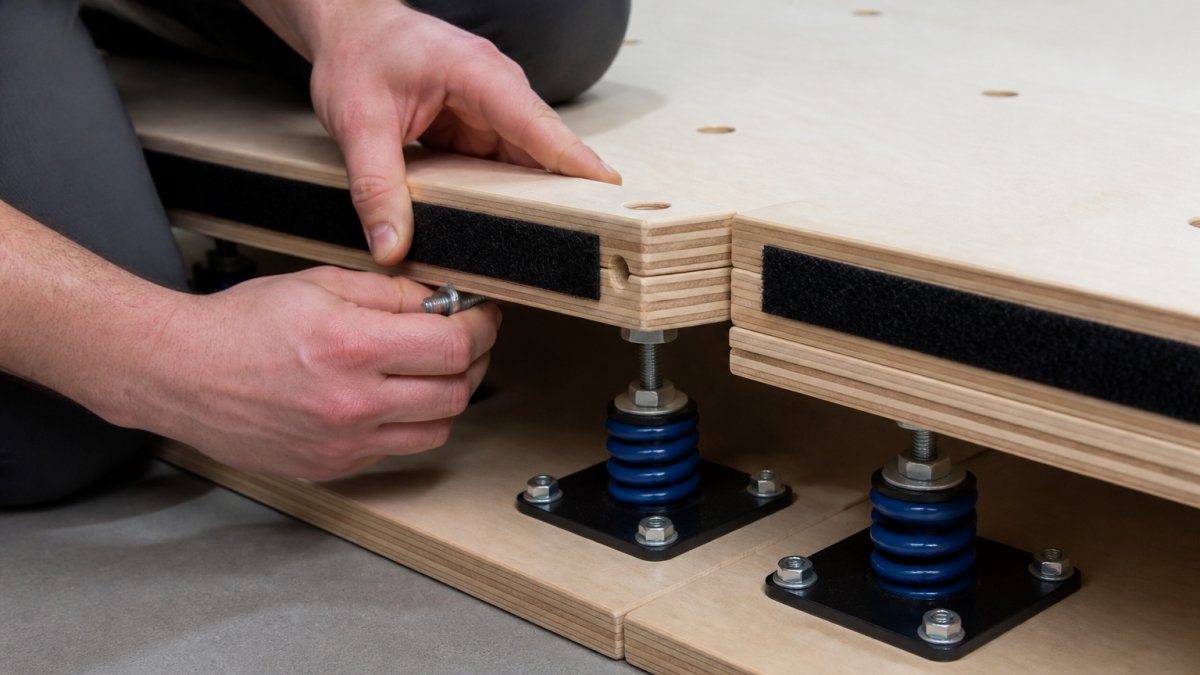
Basic tools required:
- Tape measure and level
- Wrench or socket set (for spring bolts)
- Circular saw (if cutting panels)
- Rubber mallet (for panel alignment)
- Vacuum (for cleanup)
Step 1: Prepare the base surface. Clean the existing floor thoroughly. For concrete, check moisture with a meter and install a vapor barrier if needed.
Step 2: Install the subfloor system. Position the base layer on the prepared surface (or secure it per manufacturer specs for permanent installations) and check level at multiple points.
Step 3: Install springs or dampening material. Position power springs per the layout plan, typically 16-24 inches apart, and bolt each securely with the specified fasteners and thread-lockers.
Step 5: Test and adjust. Walk across the floor and press down firmly in multiple locations, checking for soft spots, movement, or shifting panels.
Installation typically takes 1-3 days depending on size and complexity. Glory and Power Enterprises provides detailed installation guides and can answer questions during the process.
Maintenance and Cleaning to Extend Floor Life
A sprung floor is a long-term investment that requires consistent care to maintain performance and durability.
Regular cleaning is the foundation of maintenance. Sweep or vacuum daily, damp-mop weekly with mild soap, and avoid excessive water, sprung floors shouldn't be soaked or left wet.
Inspect springs and fasteners monthly. Check that bolts remain tight and thread-lockers haven't loosened, and tighten loose fasteners immediately. Squeaking or creaking during training often signals loose components, address it before it becomes movement or instability.
Monitor for soft spots or movement. Watch for areas that feel softer, bouncier, or unstable, usually a loose spring or damaged subfloor section. Mark the location and investigate.
Manage moisture. Keep humidity between 35-55%: high humidity swells and warps wood, low humidity causes shrinkage and cracking. Use dehumidifiers or humidifiers as needed, and check periodically for moisture accumulation under the floor, especially in basements or damp areas.
Replace damaged panels promptly. A cracked or warped panel compromises the whole system's performance and can create safety hazards, so replace rather than repair it.
Maintenance costs are minimal: cleaning supplies and occasional fastener replacement. Most sprung floor systems last 10-15 years with proper care.
Sprung Floors Versus Standard Hard Flooring
The choice between sprung flooring and standard hard flooring comes down to training goals, budget, and long-term vision.
| Factor | Sprung Floors | Standard Hard Flooring |
|---|---|---|
| Impact absorption | Excellent; reduces joint stress | Minimal; transfers force directly to joints |
| Athlete comfort | High; feels responsive and forgiving | Low; feels hard and unforgiving |
| Injury risk | Lower; cushioning protects joints | Higher; cumulative impact stress |
| Installation cost | Pricing depends on quantity, dates, and delivery | Lower initial cost |
| Maintenance | Regular cleaning and inspection | Minimal; basic cleaning only |
| Lifespan | Durable with proper care | 5-10 years depending on material |
| Suitable for | Dance, gymnastics, martial arts, cheerleading | General fitness, basic training |
| Performance consistency | High; maintains responsiveness | Variable; can develop soft spots or cracks |
Hard flooring is cheaper initially and needs less maintenance, and may suffice for basic fitness classes or occasional training. But for competitive athletes training multiple days per week, the long-term costs, injuries, lost training days, eventual replacement, can be significant.
Sprung floors represent a commitment to athlete safety and performance. For studios serving serious athletes in gymnastics, dance, martial arts, or cheerleading, a sprung floor system is an investment in reputation and long-term viability: athletes train harder and longer on floors that protect their joints, and studios with quality flooring attract and retain better athletes.
For small spaces the decision is more nuanced: every inch must work hard. A sprung floor maximizes the space by allowing intensive training without premature joint wear, and signals to athletes and parents that the studio takes training seriously.
Choosing flooring for a small training space means balancing immediate costs against long-term performance and athlete safety. Sprung floors for small training spaces deliver measurable benefits: reduced injury risk, improved training consistency, and athlete confidence. Glory and Power Enterprises manufactures professional-grade sprung floor systems designed for competitive training environments, featuring two-layer Baltic birch construction with power springs for durability and reliable performance. Explore customizable options and financing solutions to find a system that fits your space.
Frequently Asked Questions
Can you install a sprung floor over concrete?
Yes, sprung floors can be installed over concrete using a floating subfloor system. The subfloor creates a gap between the concrete and the sprung floor panels, allowing the springs to absorb impact properly. This is ideal for basements or facilities without existing wood flooring. Ensure the concrete is clean, dry, and level before installation. A moisture barrier may be needed in humid environments to protect the wood layers.
What is the difference between a sprung floor and a floating floor?
A sprung floor uses power springs mounted to a subfloor to absorb shock and provide bounce, making it ideal for gymnastics and dance. A floating floor sits on foam or rubber pads without springs, offering cushioning but less rebound.
How much clear space do you need around a sprung floor?
Plan for at least 3-4 feet of clear space on all sides of your sprung floor for safety and movement. This buffer zone prevents athletes from hitting walls or obstacles during training. In small spaces, measure your room dimensions first and work backward from the 3-4 foot clearance requirement to determine your maximum floor size. Adequate clearance reduces injury risk and improves training quality.
How do you maintain a sprung dance floor in a compact studio?
Clean your sprung floor regularly with a soft broom or vacuum to remove dust and debris. Wipe spills immediately with a damp (not wet) cloth to prevent moisture damage. Check the hook-and-loop fasteners and panel edges monthly for wear or separation. Inspect power springs and bolt fasteners annually to ensure they remain secure. Avoid dragging heavy equipment across the surface, and keep humidity levels stable to protect the wood layers.