 how-to
How to Fix Dead Spots in Floors: A Step-by-Step Guide
Table of Contents
- What Are Dead Spots in Floors and Why They Matter
- Assessing the Damage: Identifying Dead Spots
- Tools and Materials Needed for Floor Panel Repair
- Step-by-Step Process: Repairing Floating Floor Soft Spots
- Fixing Hardwood Floor Surface Damage and Gaps
- Leveling Subfloors and Addressing Structural Issues
- Signs of Sprung Floor Fatigue and Prevention
- Sprung Floor Maintenance Tips for Long-Term Performance
- Frequently Asked Questions
Last Updated: September 21, 2026
What Are Dead Spots in Floors and Why They Matter
Dead spots in floors are soft, sunken, or unresponsive areas where the flooring no longer provides proper support or cushioning. They typically develop in sprung athletic floors when the underlying structure, whether foam, springs, or the subfloor itself, degrades or shifts over time. These areas feel different when you walk, jump, or land on them. They may also produce a dull thud instead of the responsive bounce a proper floor should deliver.
For gymnastics facilities, dance studios, martial arts schools, and competitive athletic spaces, dead spots create safety and performance problems. Athletes lose confidence on unstable surfaces, and the lack of consistent support increases injury risk during high-impact movements.
Distinguish between cosmetic surface damage (cracks, dents) and structural issues (soft spots, compression). Surface problems need refinishing; soft spots require accessing the void beneath and addressing the root cause.
Assessing the Damage: Identifying Dead Spots
Visual and Physical Inspection Techniques
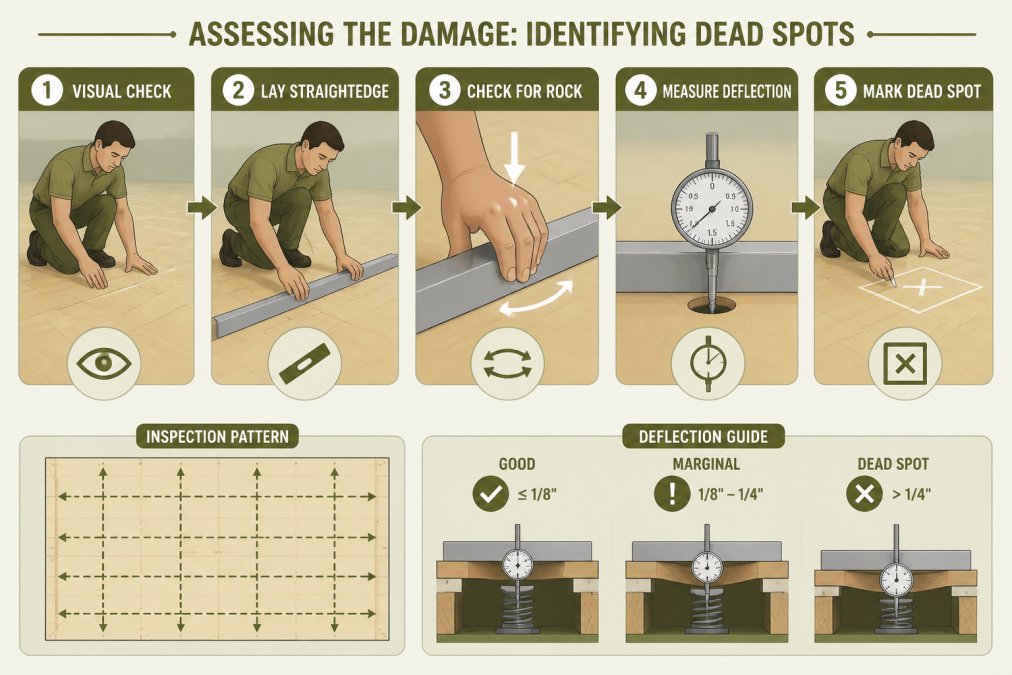
Walk across the floor systematically, marking areas with slight give or compression. Press down firmly on suspected spots, healthy floors resist pressure, while dead spots feel softer and don't spring back immediately.
Use a straightedge to check for low spots and gaps underneath. Take photos of depressions, water stains, or visible gaps between boards, these indicate deflection, voids, or structural failure.
Listen for squeaks, creaks, or hollow sounds, which indicate loose fasteners, voids, or layer separation. A properly installed sprung floor should sound consistent across all areas.
Distinguishing Between Subfloor vs. Surface Issues: A Diagnostic Framework
Determine whether the problem is cosmetic or structural, misdiagnosis leads to wasted effort and recurring damage.
Surface damage (scratches, scuffs, dents) feels solid and resists hand pressure uniformly. These affect appearance only and can be addressed with sanding and refinishing.
Subfloor or structural issues cause soft feel, uneven bounce, or deflection under weight. Dead spots and buckling indicate subfloor failure requiring access to the void beneath.
Quantifying Deflection: The Hand-Press Test
Press down firmly on a suspected dead spot and observe rebound time: Immediate rebound (under 1 second) indicates intact subfloor and likely surface damage. Delayed rebound (2-5 seconds) signals foam or spring loss or moisture damage. No rebound (over 5 seconds) indicates severe degradation or joist failure requiring professional assessment.
Moisture Assessment: A Critical Diagnostic Step
Moisture is the leading cause of subfloor deterioration. Use a moisture meter, wood subfloors should read 8-12 percent; above 15 percent indicates water intrusion. Identify and eliminate the moisture source before repairing, or repairs will fail.
Visual Inspection Checklist for Structural Failure
Inspect for red flags: visible mold or discoloration, soft or crumbly wood, gaps or separation, buckling or warping, or musty odor. Any of these indicates the subfloor must be accessed and the underlying cause addressed.
Tools and Materials Needed for Floor Panel Repair
Gather: pry bar, moisture meter, straightedge, putty knife, sanding equipment, foam injection system or leveling compound, wood filler, polyurethane finish, sandpaper (80, 120, 220-grit), safety equipment, and cleaning supplies. For structural repairs, also prepare lumber, fasteners, and reinforcement materials as needed.
Step-by-Step Process: Repairing Floating Floor Soft Spots
Preparing the Work Area
Clear the floor of equipment, mats, and furniture. Sweep and vacuum thoroughly. Mark the damaged area and surrounding zone with tape, identifying the full extent before beginning repairs.
Accessing the Void and Filling Techniques
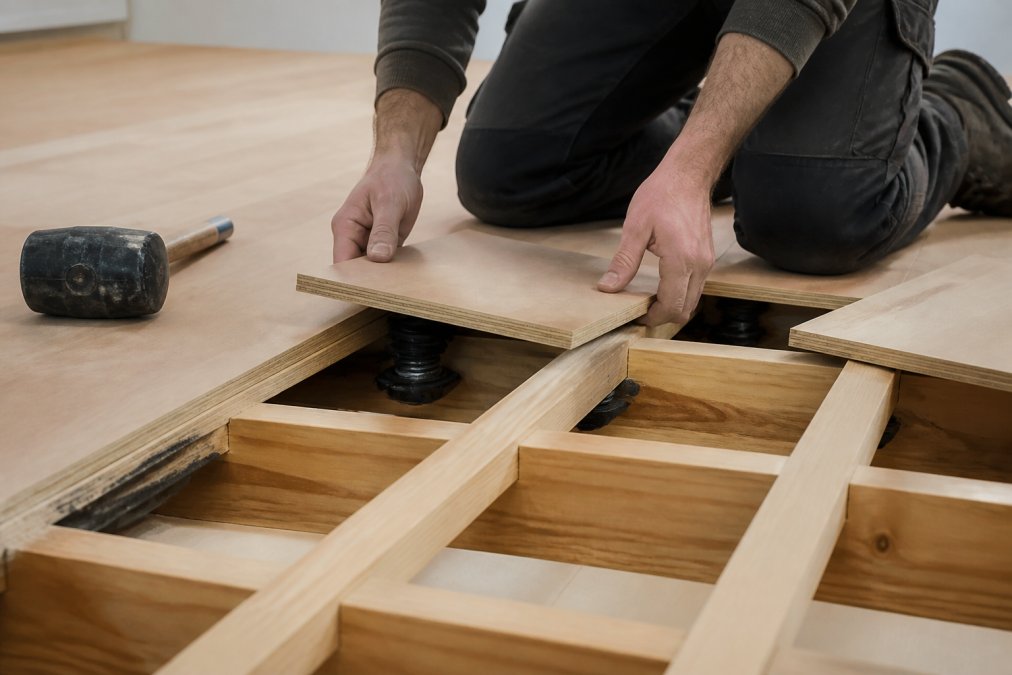
Access the void by carefully lifting the affected panel with a pry bar. Inspect for moisture, mold, deteriorated foam, or debris and remove damaged material. For foam injection, use a specialized system to fill voids, inject slowly to avoid over-pressurizing. For leveling, apply self-leveling compound to fill low spots, then allow full cure before reinstalling.
Sanding and Refinishing After Repair
Reinstall the floor panel and secure it. Sand with 80-grit, then 120-grit, then 220-grit sandpaper. Vacuum and wipe with a tack cloth. Apply polyurethane finish in multiple coats, sanding between coats and allowing full drying.
Fixing Hardwood Floor Surface Damage and Gaps
Using Wood Filler and Putty Knife Techniques
Use wood filler or putty matching the wood color. Apply with a putty knife, pressing firmly into cracks and gaps, then scrape excess flush. Sand smooth with 120-grit then 220-grit sandpaper. Wipe dust and apply finish.
Applying Polyurethane and Floor Finish Coats
Apply polyurethane (water-based or oil-based) with a brush or roller in long, even strokes. Use multiple thin coats, sanding between coats with 220-grit sandpaper. Leave the final coat unsanded. Allow 48 hours cure before foot traffic.
Leveling Subfloors and Addressing Structural Issues
Understanding Repair Method Trade-Offs: Foam Injection vs. Leveling Compound vs. Joist Replacement
When learning how to fix dead spots in floors, you'll find three primary methods address subfloor voids and soft spots, each with distinct advantages and limitations.
Foam injection fills voids with expanding polyurethane foam. Advantages: works on wood and concrete, minimal disruption, fast cure (24-48 hours). Limitations: over-pressurization can cause buckling, foam doesn't bond permanently, difficult to adjust if it fails, and traps moisture if present.
Leveling compound fills low spots on concrete subfloors. Advantages: creates permanent level surface, bonds chemically to concrete. Limitations: concrete-only, requires clean/primed surface, slow cure (3-7 days), fails if concrete settles or moisture is present.
Joist replacement or reinforcement addresses root causes of sagging. Advantages: permanent support, restores structural integrity. Limitations: labor-intensive, requires flooring removal, may need temporary support, requires professional assessment, not suitable for minor soft spots.
Using Leveling Compound on Concrete Subfloors
Clean concrete thoroughly and remove loose material, paint, or sealant. Test moisture content, concrete should be below 85 percent relative humidity. Prime according to manufacturer instructions. Mix leveling compound to exact water-to-powder ratio, pour onto low areas, and allow to self-level. Avoid foot traffic until fully cured (24-72 hours).
Reinforcing Wood Subfloors and Joists
Wood subfloors depend on solid joists for support. When joists deteriorate, sag, or become damaged, the floor above develops soft spots and deflection.
Inspect joists carefully for rot, insect damage, or structural failure. Look for:
- Soft or crumbly wood that yields to screwdriver pressure
- Visible mold or discoloration
- Cracks or splits running perpendicular to the grain
- Sagging or visible deflection
- Evidence of termite or carpenter ant damage (small holes, sawdust, tunneling)
Rotted wood should be removed and replaced. Damaged joists may be reinforced by sistering, installing a new joist alongside the damaged one and fastening them together securely with bolts or lag screws spaced 12 to 16 inches apart. The new joist must be the same dimension and grade as the original and must extend the full length of the damaged section, plus at least 12 inches beyond on each end.
For sagging joists, additional support may be added with posts or beams. This requires careful measurement and installation to avoid creating new problems. Posts must rest on solid footings (concrete pads or footings below the frost line); they cannot rest on the floor or soil. Improper post installation can cause new structural issues. In many cases, professional structural assessment is warranted before attempting joist repairs.
Ensure all fasteners securing the subfloor to joists are tight. Loose fasteners contribute to movement and soft spots. Inspect the fasteners (nails, screws, or bolts) that connect the subfloor to the joists. Tighten or replace fasteners as needed.
When to Call a Professional
Structural repairs require expertise and precision. Consider professional assessment if:
- Moisture testing reveals elevated moisture levels (above 15 percent in wood, above 85 percent RH in concrete)
- Joists show signs of rot or significant damage
- The dead spot is large (more than 2-3 square feet) or affects multiple boards
- The floor has sagged more than 1/4 inch over a 10-foot span
- You are uncertain about the underlying cause
- The repair involves temporary support structures or load-bearing modifications
A structural engineer or experienced floor technician can assess the damage, identify the root cause, and recommend the most durable repair method for your specific situation.
Signs of Sprung Floor Fatigue and Prevention
Sprung floors age gracefully when properly maintained, but they do show signs of wear over time. Recognizing these signs allows facility managers to address problems before they become severe.
Sprung Floor Maintenance Tips for Long-Term Performance
Consistent maintenance extends floor life and prevents the development of dead spots. Establish a regular care routine.
Frequently Asked Questions
What causes dead spots to develop in sprung dance floors?
Dead spots form when the power springs beneath the floor lose compression, when void spaces develop between the subfloor and surface panels, or when moisture damage compromises structural integrity. In high-traffic athletic environments, repeated impact and floor deflection can compress the foam underlayment or break fastening systems. Proper maintenance and regular inspection help catch these issues before they create noticeable soft spots.
Can dead spots in sprung floors be repaired without replacing the entire system?
Yes. Many dead spots can be fixed by filling voids with leveling compound, replacing damaged panels, or reinforcing joists. The repair method depends on whether the issue is surface-level or structural. Surface abrasion and gaps respond well to wood filler and refinishing. Deeper subfloor voids may require foam injection or panel replacement. Assessing the damage carefully determines whether localized repair is sufficient or if larger sections need attention.
How often should sprung floors be inspected for structural integrity?
High-performance athletic floors should be inspected quarterly or every 3 months, and more frequently in heavy-use facilities. Walk the entire floor systematically, checking for soft spots, floor buckling, expansion gaps, and squeaks. Listen for changes in how the floor responds to impact. Regular inspection catches early signs of sprung floor fatigue before they worsen, saving time and expense on repairs.
What are the best tools for floor panel repair in athletic facilities?
Essential tools include a straightedge for detecting floor deflection, a putty knife for applying wood filler, a sander for smoothing repairs, a level for checking subfloor evenness, and a moisture meter for identifying damage. For larger repairs, a floor leveler, joist reinforcement brackets, and polyurethane applicators are valuable. Having the right tools ensures repairs are done correctly and finish coats adhere properly.